|
12 February, '07
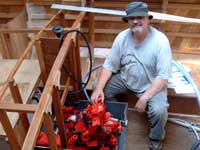
With the engine beds, the fuel tanks and most of the systems
in place it was time to put the little Bukh diesel in, and yesterday
that’s just what we did. Picked it up between us, put
it up into the cockpit through the space where the transom will
be, and from there up and over the bridgedeck framing and onto
the engine beds. There he is, at home at last.
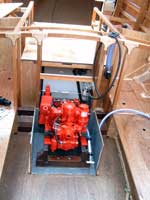
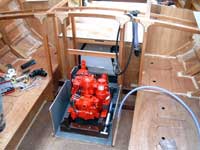
Now Charlie has a visual guide as to spaces in that area. We
are going to modify the locker under the bridgedeck to take
a custom packed RFD 4 Man offshore liferaft so although its
possible to measure the engine and draw plans for it , having
the diesel in there means that the engine box and companionway
steps can be built and access to the engines service and adjustment
points can be checked as the structures are put into place.
Even the swing of the hand start crank can be checked for clearance,
we want no skinned knuckles here.
You will note that there is a large filter on the fuel line.
While the Bukh is only 7.5 hp and sips very gently at the fuel
tank, a water trap and fuel filter to augment the one built
into the engine is a very worthwhile safety measure, especially
when filling at some of the more remote places which may not
be used. This transparent filter enables the skipper to tell
if there is water, bugs, algae or dirt in the fuel, and with
luck he can get to it before the engine’s injector pump
or injectors are damaged.
The control panel and the combined throttle and gearshift are
next to be fitted, and with that and the exhaust in place the
engine could be test run, another milestone.
Elsewhere there has been more building going on, there is a
lockup locker for the inflatable tenders outboard is being built
inside the portside aft cockpit seat, there is a hold under
the after end of the cockpit, its quite a big one, room enough
for a heap of gear if required. Charlie has just bought a plastic
baitwell hatch about 350mm sq opening so he can access that
space, it will go in the cockpit floor well aft. He also has
a hatch to access the side seat locker on the starboard side
so the exhaust loop and transom fittings can be reached. It’s
a roomy little boat but this stage of the fitout seems to see
spaces filling up rapidly.
|
|
The cockpit seating framework is close to ready to cover with
plywood and it wont be long before the transom is ready for
fitting. Having the cockpit all complete will means that taping
with glass tape, sanding and painting can be done soon. I am
looking forward to sitting in there and dreaming, you know your
hooked when ( like I have done in the past) you put the tiller
in temporarily so you can hold it while daydreaming. Aaah!
Charlie’s been painting, water based paint over a primer
compatible with the epoxy primer in all those areas where he
wont be able to get at the interior easily. He is using a pale
cream, it gives good coverage and its very easy to see if the
brush has spread it too thin because the gold coloured wood
shows through. I have no idea what colour he is planning to
use in the cabin, it will be a pity though if he hides all that
lovely golden wood.
There are bookshelves beginning to appear, room enough for
perhaps 200 paperbacks, one a day for the planned duration of
the voyage! Most cruisers join the informal book swap circuit
and every anchorage sees dinghies shuttling from one boat to
another with bags of second hand books, the crews looking for
enough literature for the next long ocean voyage.
One of the not so easy jobs lately has been the cutting to
length of the keelbolts. They are of a high grade cast Silicone
Bronze rod, really tough stuff and it does not machine or cut
easily so hand cutting the threaded ends has been a mission.
Sure one end was already done by the supplier which helped,
but after cutting the bolts accurately to length it took ages
to put the threading on the other.
The structural keelbolts are all in now, we had to jack the
boat up another 200mm or so to get underneath to counterbore
the holes but that was no problem. With those long bolts in
place there is no chance of anything coming loose there!
Note that drilling the long keel bolt holes was not really
a big deal, a plumbob as a guide, one of those standard engineering
twist bits welded to a piece of steel bar ( a fraction smaller
than the drillbit so friction was not an issue) and some patience.
Charlie has the holes all within tolerance and that’s
about a 6mm maximum error at the other end of an 800mm hole.
Good work that man!
Next? The engines exhaust and controls, then back to fitting
out the main cabin to a point where the cabin sides can go on.
Then hatches, mast step, (must get on and draw it) and it wont
belong before the chainplates are being fitted! At that stage
we will almost be able to smell the salt water.
Oh yes, I was given a cast iron bathtub the other day, that’s
going to be our crucible for melting the ¾ ton of lead!
Big job that one!
JohnWelsford,
Designer |