|
20 August, '06
Working on an upside down hull is oddly anonymous, there is
little feel of the boat's final shape and character and to an
uneducated eye no real idea of how the water will flow past
the hull. Proportions are distorted and its not really a “boat”
to the eye until the magic day comes when she is upright.
We’ve just hit that day with Resolution. After another
trip to Bart's Laminated Timbers to raid the reject rack I drew
a sketch plan of a rollover cradle that would use the material
we had. The intention was to support the boat and isolate it
from the strain of sitting on its gunwale as she came over,
and to support the keel if we dropped her on the way over.
| 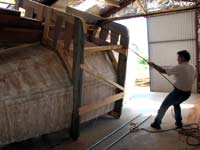
A good shot of the cradle and the block and tackle set used to heave the boat over. A similar block and tackle set was used on the other side to take control as the hull came past the balance point. |
I'd eyeballed the ceiling height as being just adequate, and with her part way up it was time to check. We were ok, just! We lost one light bulb when the cradle contacted it, but otherwise we had about a handspan width to spare.
|
We also drilled and fitted three big lengths of threaded rod
to put that big300 kg stack of kwila deadwood (keel) under compression
so it would be better able to cope with the shocks and strain
of being on its side, as mentioned in the last diary this was
a potentially scary job but with some preparation and care it
went well.
The day arrived when the workshop had been cleared out to make
space. The cradle was all built, and we had run out of things
to do. It was time to give it a go. Friend Andrew turned up
to have a look at the project, just perfectly on time. He had
a couple of hours to spare so was roped in, and we got on with
it.
We had a big block and tackle each side, one pulling to bring
the boat over and one as a brake to prevent a runaway. Andrew
took the brake, and we two pulled her up on one corner of the
jig, tied her off and checked carefully that all was well.
No problems, as the steel portal frames that my workshop is
built around are at wide spacings so we were not able to pull
perfectly square. So there was just a slight skid of the jig
that had her slightly off line. We pushed her back straight
and put a rope on one end to prevent more movement.
| 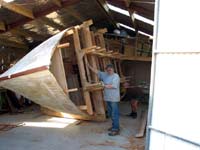
Halfway
- the building frame is about to come off, and the hull
can then be moved across on the pipe rollers to position
her for the next stage of the rollover. This workshop
is only just big enough to flip the boat without having
to drag her outside, but with some care it worked out
fine. |
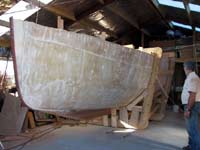
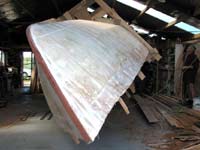
Up the right way! Yeehah!
No accidents, not even any "oops's".
Click images for
larger views
|
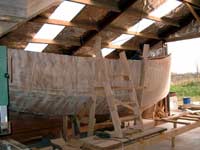
Once on her side the building frame/jig had to come off, this
is a pretty big construction, 180mm x 75mm laminated beams almost
6m long with legs, cross pieces and lots of uprights and braces.
Heavy! The hull is not easy to handle and jacking it up in the
air to get it off the jig was not an option so we had chosen
to put the boat on her side and then unbolt it, take it away
and then continue the roll.
That all went well, I can see where the big pile of bolts went,
lots of them. We pulled all but one middle bolt out, got one
of us on each end and pulled the middle one out, and walked
the jig outside though the big double doors. All of a sudden
there was a lot more space in there!
After some checking we pushed her across the workshop on her
pipe rollers so there would be room for the second part of the
rollover, tied her off again and pulled. Over she came, Andrew
on the brakes taking control of the movement as she went past
the balance point, and putting her gently down right way up
and stable. Whew!
Another one of the big scary jobs all done. No problems, and
with careful preparation plus some welcome help from Andrew
not that hard to do.
After Charlie had sat in the saloon, a big grin all over his
face, he pitched in to pull the no longer needed cross pieces
and braces out, making the space much more easily seen and giving
the boat a feeling of what she may feel like when finished.
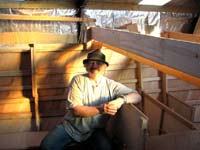
Done, the
happy builder sitting at what will become the galley.
How’s that for a big grin! |
Ready for the next few
months intensive activities, there's lots to be done
but its mostly a lot of small jobs rather than huge
pieces of lumber and heavy work.
|
Comfortable is a word that comes to mind! Lots of room, nice
long bunks, plenty of legspace, lots of storage and lots of
elbow room. Drawing a boat on paper is a matter of theory moderated
by experience, but its really nice to be inside and see that
she is as intended.
We brought the stripped building frame inside, set it up alongside
the boat with some old scaffold planks (thanks again Bart's
Laminated timbers) as a decking, and built a ladder to ease
the task of climbing in and out. That’s all done but its
still 2 metres up to the gunwale and a long climb if done too
often.
So, a small GMC 150mm ( 6inch) bandsaw ( Ryobi make a similar
one) was purchased, mounted on the galley bench flat this, together
with a vice and a few other bits and pieces transfers the workbench
function inside to save that climb. While the little bandsaw
is small and lightly built, if used carefully it can cope with
up to 50mm cut and will be able to cut almost all the materials
used for building the boats interior.
With that done, the first job is to begin the task of scraping
and sanding the inside of the planking where epoxy has been
forced through the gaps and screw holes when the second layer
of planking was being fitted, a choice of what to finish the
interior with has yet to be made, varnish or paint? There are
advantages each way, and I suspect that paint will be the choice,
but it still needs good preparation.
Use your imagination
here. Right up in the bow is the forward crash bulkhead,
Charlie beginning the process of bonding it to the skin
with wooden fillets and glass tapes. Forward of that
will be an anchor well up at deck level, and an awning
locker behind a watertight hatch under that. Just in
front of the builders knees is a half crash bulkhead
ahead of which is to be a chain locker, with sail storage
each side of that. The chain will live in a canvas bag
slung from supports low down in the boat, and it will
run in through a deck fitting and chain pipe. Where
Charlie stands there will be a portapotty, and an area
set up as a washroom and ablutions area, each side of
that there will be big bins with smaller lockers up
under the decks for Bosuns stores. Plenty of room up
here.
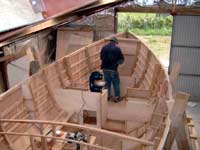
To port with the little
bandsaw on it is the galley, not large, just a single
burner stove and a bucket for a sink. The KISS ( keep
it simple, stupid) principle applies here while to starboard
you can see the framing for the chart table and the
storage drawer underneath it.
|
Scraping and sanding a surface as big as Resolutions interior
is a monotonous job, and to make it easier to tolerate there
are several other jobs going on at the same time. One being
the preparation of the watertight bulkheads for sealing off
with fibreglass tapes. This entails filling any gaps between
the frame edge and the planking with glued in wooden wedges
then putting 100mm wide glass tapes in so the frame is very
strongly bonded to the skin and can contain water on one side
even when the skin is damaged. This also has the effect of somewhat
containing damage as smashed stringers and planking tend to
stop at the strong point that the watertight bulkhead provides.
There are Watertight bulkheads at frame one right up in the
bow, another half height one at frame two, a low one at frame
four which will contain any free water in the area. There is
another full bulkhead at the after end of the engine bay and
the engine sits in a watertight compartment some 250mm deep
so the likes of a leaky shaft log, or a weep from the engine
water cooling skin fitting or hose will be contained.
With the boat up the right way, the project takes on new life,
there is a sense of excitement, and visitors are universally
blown away by the feeling of strength and space that this little
boat has about her.
Lots to do, I’ll be in there carving that propellor aperture
this week, Charlie's inside the boat cutting wood on his new
little bandsaw as I write. The sheerline needs to be trimmed
and the boat levelled so her shape will be more easily seen.
She’s a bit bow down as you see her in these pics, by
next weeks Diary I hope to have some better pics of the interior.
My little camera has no wide angle lens and Navigator owner
John Leathwick is coming over to take some for you.
See you then.
JohnWelsford
Designer
|
