|
14 August, '06
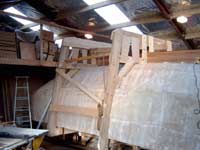
The rollover cradle doubles as the boats supports and cradle when upright, and it has to be strong enough to enable the hull to be rolled onto its side, then slid sideways to give enough space for the next half rotation. You can see that we have a lot of gear to move in the morning so we can roll the boat. |
|
I wasn’t going to do this with the rollover scheduled
for tomorrow, but what we did today has been interesting enough
to justify a diary entry of its own.
First of all, while drilling another job requiring long holes
we found that the conventional leadscrew footed auger used for
drilling big holes in wood did not run very true and was prone
to wander off the line a bit. In fact it wandered a LOT when
used in hardwood.
In traditional boatbuilding a “barefoot “ auger
with no leadscrew and specially shaped spurs (cutters) was used,
but they are so rare as to be almost museum pieces and the conventional
ones are too different to modify.
All this lead me to be hoofing off down the road to Ross Todd
Engineering in Cambridge where Paul the fitter and turner welded
two 10mm engineering twist drills to metre long pieces of 3/8in
mild steel bar, set them in the lathe and straightened the join
with a hammer, then turned the weld off flush. Nice job, done
at very short notice, and the cost was very moderate. Thanks
Guys.
When we got these home, our first job was to put holes through
the keel so we could put three temporary bolts through , we
used frames 3 and 7, one through frame 4 and two in frame 7
which is the heavy one at the forward end of the engine bay.
| 
A long
drill bit, the longest hole required is about 850mm, this
extended bit is just under a metre long. So far it seems
to run very true. |

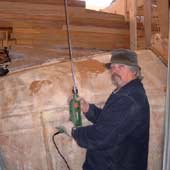
Starting the drill in
one of the holes, you can see the plumb bob in the background
and how hard Charlie is concentrating. The drill is
to push the drill in about 20mm, pull it out and clear
the waste and then in for another 20mm. Takes only a
few minutes, perhaps 5 or so to drill 600mm and it tracks
perfectly.
|
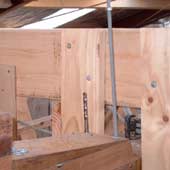
One of
the temporary bolts in place, just 9mm mild steel threaded
rod to temporarily secure the keel while the boats being
moved around. You can see the drill has just broken through
the surface to complete the second hole of this pair. |
These bolts are to make sure that the keel is secure when the
boats rolled tomorrow. Now the holes are long, the two aft ones
about 600 mm long, and they need to come out within a few mm
of the target at the other end. Not easy? Note that the target
is critical sideways, but not so much fore and aft as the ballast
keel bolts are separate systems.
What we did is we got Charlies very fancy plum bob, got inside
and suspended it from the frame 8 cross floor at the same distance
from the centreline and put the metre long drill into frame
7 with the big Hitachi drill on low speed. Lining the long length
of the drill up with the string on the plumb bob and watching
to keep it there, the holes came out well within tolerance.
Whew, another scary job turns out not to be too much of a problem.
This morning, I got the Arbourtech power wood carving disc
out and put it on the Bosch 115mm angle grinder, and after rough
shaping the after end of the keel deadwood and tailpost with
the power plane, and marking out the scalloped area around the
propellor aperture started carving away.
| 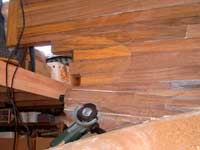
The Arbourtech
, mounted in my Bosch angle grinder is doing a fair job
of carving the complex shape around the prop shaft tube.
I need some more practice but its going to do the job. |
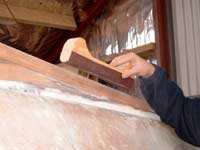
To shape the fillet
that fairs the keel to the bottom is a slow job, so
I got Charlie to make up this little shaped sanding
block, its got 40 grit commercial sandpaper contact
glued to what is just an offcut piece of two by four,
and handles cut with the bandsaw. Useful tool!
|
Interesting tool, I’d only used one a very little and
that a long time ago. It was quite different to this latest
model one which is supposed to have no kickback, and which has
little tungsten carbide cutters which I expected to make short
work of the hardest of wood.
It works fine, no real kickback but a lot of torque reaction.
It will work better with practice, and while a bit scary is
no worse than a lot of other tools. I found that either dragging
the angle grinders guard along the work and angling it so that
the trailing edge of the cutter just contacted the work kept
the torque and material removal controllable, and when smoothing
the work a very light brushing action makes a good job. It’s
a tool that should be used with caution for sure, but its doing
a job that I’d hate to have to do any other way, and I’m
pleased with it so far.
Warning, I am using the “Arbourtech industrial wood carver”
without the guard that comes with it, relying on the guard on
the angle grinder because I want to use the face rather than
the edge of the tool and the standard guard does not allow face
cutting. But be aware that the manufacturers strongly recommend
using the guard.
John Welsford
Designer.
|
