|
8 July, '06
We laid
on 200mm wide tapes cut from the same 10 oz biaxial fibreglass
as the boat is skinned with, then sanded off the rough
edges and spikes. Next we primed the wooden skin where
the Kevlar was to be, and pre cut the fibreglass and Kevlar
cloths ready to drape on and saturate with epoxy.
|
It’s been a while since I posted an update on Charlie’s
progress. Lots of magazine article writing and plan drawing,
running around finding stuff and some teaching with the Massey
University School of Design teaching a group of great young
people the basics of boat design not to mention monitoring the
build of a really interesting 40 ft power trimaran.
I’m back again though, and promise to be more regular
with my updates. (Ok Peter, I got your message.)
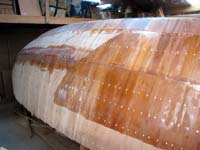
We did the big sticky job - that’s skinning the boat
with Kevlar and fibreglass, 10oz in both cases, quite thick
and certainly a huge contributor to the boats resistance to
puncture. That’s what the Kevlar is for, we covered the
area from midships to the bow from the fender wale just below
the gunwale down to the lower chine. Its not easy stuff to handle,
it is difficult to cut, does not change colour a lot when wet
out and pretty much impossible to sand smooth if you get a bubble
in it.
Thanks to boatbuilder Hugh Miller for giving us a hand. Much
appreciated.
That difficulty in sanding is also the reason why we put the
Kevlar under the glass, that allows us to sand, fill and fair
the surface without getting into trouble.
With the
fibreglass on and wetted out you can see the Kevlar crash
mat between the 'glass and the wooden skin. The Kevlar
covers the area most likely to be damaged if the boat
hits a floating object, whether a container, a dead tree
or ice. The intention is that although Kevlar does not
add greatly to the strength, it's very hard to puncture
and will greatly reduce the inflow of water; improving
the chances of effective damage control should Resolution
hit something hard. |
After squeegeeing the Kevlar on, we put the 10 oz biaxial fibreglass
cloth from side to side and ran the resin in wet on wet over
the yellow Kevlar, we got both lots of Kevlar and two 50inch
wide strips of glass on that day. Next day saw two more strips
of glass, and the third day saw us finished with that part.
It took a while mainly due to needing to get the resin beginning
its curing reaction before the temperature dropped, as it was
it stayed slightly chewy for about 48 hours but went off ok
in the end. Its winter here and we were just getting the first
of the seasonal frosts so it paid to be careful. Besides, by
about 3pm we’d had enough of that game for the day.
After sanding the worst of the bumps off and filling the major
hollows Charlie then put a mix of West 410 microlite and resin
on with a roller, two coats to build up a film that would allow
him to sand her fair without getting back to the fibreglass
cloth.
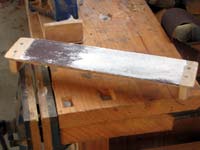
Then started the hard stuff, I made up a couple of longboards,
100mm wide and about 700mm long, slightly springy with 80 grit
sandpaper. I’d say that our hero has much larger shoulders
than he had when he began!
My old Bosch PEX 125 random orbital sander did sterling service,
but between the hand sanding and machine sanding plus filling
and fairing it took quite a few days, but she will look lovely
when painted.
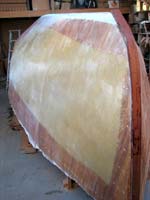
Getting
a nice even finish on the fibreglass takes a lot of work.
I am sure that Charlie's shoulders grew noticeable with
the work that he put in over a couple of weeks. This is
a short 'longboard" with 60 grit commercial sandpaper
contact glued to it. It sands the tops off the bumps and
leaves the hollows showing clearly so they can be filled.
We used West Resin with 410 Microlite mixed in and applied
with a roller, then spot filling with a steel putty knife. |
After that was over, a capping of five layers of 6mm hardwood
was laminated around the stem, leaving a small projection which
will tie into the keel, this has been bevelled and forms the
cutwater and the flat for the bobstay fitting. Its starting
to look rather smart up on that end of the boat, not like the
after end where we wont be fitting the transom until very near
the last. Why? Imagine this little monster sitting in her cradle
while the interior and cabin are completed, its over six feet
up from ground level to the gunwale, and every time you want
in or out it's climb up and down all that way. Easier to put
a ramp up through the open transom.
Next up was the keel, now that’s complex stuff, the propshaft
tube had to be fitted, absolutely accurately positioned in both
axes and then the keel built around it. I had Charlie make a
template of the after end of the keel, drawn full sized from
the scaled up plans he propped it up and measured off the angles
and length of the propshaft tube, and we split a length of 80mm
x 160mm Kwila and used the table saw to hog a semicircular groove
lengthwise down each half.
Next job was to build the section of the keel between the boats
bottom and the propshaft leaving the angled shaft tunnel piece
at the right angle, then scribe and cut the tunnel piece.
Charlie chopped a hole through the bottom and the frame #8
cross member and the shaft tube slid into place beautifully.
“ Glue it quick while it looks right!”
With the
glass on, it's the keel next. Great big lumps of 150mm
x 70 mm Kwila. This stuff is HEAVY! There will be about
300 kg of it in the keel structure, plus of course the
720 kg of the lead casting! Here is a view of the area
around the propshaft and propellor aperture. There is
a lot of shaping to go as yet and although we use an angle
grinder with coarse sandpaper to sculpt softwood, it just
makes clouds of smoke on this very dense wood so we are
looking for a tungsten carbide tipped wood carving disc
to complete the job. |
We had to pull the boat forward about a metre to get the stern
out from under the mezzanine, not hard to do but boy that building
frame was well bolted down, it took two attempts before we had
it free but then a good pull with the old Toyota and she moved,
only about a foot too far, and with a car jack and a couple
of levers we heaved her back into the right spot. Shes moved
her first, and seemed very willing. A good omen perhaps.
C. T. W. now has a large amount of the keel built, slinging
the big baulks of dense hardwood around as though he’s
done it all before. I note a considerable improvement in his
self confidence as the project goes along. I was aware that
the prospect of build the keel bothered him a bit, especially
the area around the prop and shaft, but he’s smiling and
getting on with the job really well now.
I have bought a couple of new bandsaw blades today, one is
8 teeth per inch and about ½ inch wide, and one three
teeth per inch and 5/8 wide, the latter for deep cutting of
hardwood. My bandsaw is a 2 ½ hp model, heavier by far
than most handyman machines and its only just coping with the
big lumps of this very tough timber.
I hear the 10 inch Makita skilsaw going at it with a will,
and the little Bosch power plane. This from a man who was quite
tentative with power tools not so long ago. Good stuff, he’s
getting more organised and more productive as his confidence
grows.
I need to buy a power carving tool the kind with tungsten tips
that goes on an angle grinder and is used for rapid removal
of material, the 36 grit sandpaper that we use on the softwood
just makes clouds of smoke on the kwila, anyone know of a New
Zealand company that stocks them? I need one about 90 or 100mm
with some spare tips.
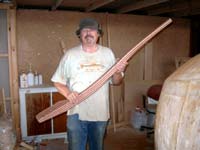
Charlie will have this in his hand for a lot of hours, the tiller is laminated from layers of lovely rich red Jarrah hardwood and pale honey coloured Fiji Kauri. It has a nice, reassuringly solid feeling about it and looks stunning. |
While the glue has been setting up on each stage of the keel,
its huge joints held down by some big 20 kg quarried paving
stones and lag screws (carriage bolts in some parts of the world)
he’s pitched into building the rudder. That’s a
big lump in itself, about 6 ft high and 22 inches wide at its
widest, laminated from 40 x 40 mm (1 5/8in) strips with the
first four being in Jarrah hardwood and the rest being Fijiian
kauri, glued and through bolted. We are waiting for a very long
drill but sections of the rudder are all glued up.
I’ve been getting on with the drawings, made a list of
keelbolts (coming from Port Townsend Foundry up on Puget Sound,
thanks Pete and Cathy) and am building more shelving for my
as yet incompletely fitted out workshop, I need to get more
of my stuff off the floor so we have moving around space and
a set of shelves for all the treasures Charlie is buying on
Ebay and TradeMe. It gets like Christmas sometimes with all
the parcels coming in and we need to keep them all together
so he knows what he’s got.
We now get regular visitors coming to look, and although many
have concerns about the trip when they hear about the small
boat and the length of the planned voyage those who have come
and seen the real thing are smiling when they head off down
the driveway. That includes a professional ship surveyor who’s
training was in wooden fishing vessels, and that was really
reassuring.
Bye for now,
JohnW
Designer.
|
