|
30 April, '06
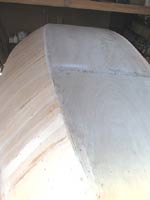
Progress, all of the planking is on, the boat feels incredibly strong and she is looking a lot more slippery and streamlined than her beam and freeboard would suggest that she will. But of course she’s still upside down and we are seeing her from the fishes point of view. But that’s ok, it’s the underwater shape that affects her sailing ability and slippery is what we want.
Right now Charlie is putting the second layer of ply on the bottom panel, that brings the bottom up to 18mm ( almost 3/4inch) and will complete the skin by tomorrow.
|
A view along the bottom showing the bottom panel ready for the next layer of 9mm plywood. The keel goes along the centreline and will be through bolted to the hardwood frame cross members just through the plywood. |
|
|

A shot of the intersection of the double side planking and the bottom panel before the second layer goes on, nice tight joints and you can see how solid the side panels are. Its very important in this type of construction to ensure that there are no voids between the layers, that leads to rot, loss of strength and bumps in the hull. |
|
|
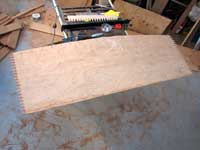
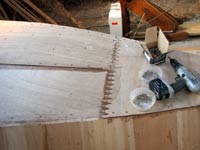
This is one of the panels ready to go on, note the template for the tooth pattern on the panel ends, this zigzag pattern when screwed to the frame cross members underneath are as strong as a scarf joint but is much easier to make in place on a curved surface. |
|
We’re getting lots of emails telling us that the readers are enjoying watching the build, and I must say that although I spend most of my time in the office or trying to keep up with the weeds in among our trees and shrubs I enjoy watching the progress as well. Aucklander Blair Cliffe is coming to visit tomorrow and Wednesday, he wants to help so we are going to start him in on fairing the boat with a longboard. ( Hard work!)
The longboard is a 100mm wide strip of plywood about 800 long with a handle on each end and a patch of 46 grit silicon carbide sandpaper in the middle. The idea is to rub it back and forth at 45 deg, and then at 45 deg the other way to indicate the highs and lows in the planking. We can then attack the high spots with a very fine set plane or the random orbital sander to bring them down a bit.
Our objective is to get the boat's sides wobble and bump free before we fibreglass her so we don’t need much in the way of filler. It’s a long process, laborious (that’s why Blair is going to get the job, he’s a lot younger than either of us) but it makes a big difference to the finished job.
We had a good day last week, drive up to Auckland to do several jobs, most of which we were successful at. No fuel tank for the heater though, so Charlie has ordered one from West Marine, 2 gallons should keep the Force 10 pressure kerosene heater going to dry his socks for several days on one filling.
|
|
Working back from the bow, the second piece on and the screws going in. Across the joints and down the centre of the bow piece the screws are 25mm x 10 g as there is material behind to screw into. But after the glue is applied the main parts of the panel are fastened together with 12mm x 10 c/s head screws on a 200mm grid spacing to ensure that there are no voids between the panels.
|
Although he plans to sail westward along the 40th parallel which is only just south of where we Resolution is building, and is not so very cold even in winter the cloud cover can be pretty persistent at times so a cabin heater is a real luxury, dry clothes, warm cabin at least part of the time, and the ability to air the boat out after several days of rain is as important as it is to provide warmth on his one dip down close to the ice zone when he rounds Cape Horn.
The heater is a kerosene burner very much like the familiar Primus one, mounted in a cylindrical metal shell with a flue (chimney) which takes the fumes and water vapour that is a by product of burning hydrocarbon fuels outside. There is a surrounding shell through which the air is drawn by convection which warms it and which protects the crew from burns if they come into contact with the heater. I am keen to fit a rail around the heater which will make it easy to hang the socks and mittens there to dry, Charlie laughs at my insistence on dry socks but I an sure that he’ll appreciate them on a cold rainy morning when he’s getting organised to go up on deck.
Note that we chose kerosene because the cooking stove, navigation lamps and cockpit lamp all use the same fuel including the alcohol for priming and can be serviced with the same tools.
John Welsford
Designer
|
