|
13 February, '06
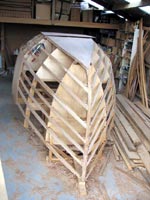
Its been a good week for progress out there in the shop, at least in a visual sort of way. Resolution has a lot more planking, in fact the port side topsides panel is all the way to the stem where the planks run full length from bottom chine to gunwale and there is a big panel of plywood on the bottom from frame four where the panel will join on the heavy hardwood floor.Note that we are using a 50mm deep by 30mm pitch zigzag joint rather than a scarf join as its easier to set up and get engaged accurately with the next piece when under tension going around the curve of the bottom.
Bottom panel on from stem back to B#4. This is the first layer of two thicknesses of 9mm ( 3/8in ) plywood that forms the bottom, and each join is placed on a hardwood cross floor and staggered by one frame so there are no weak spots.
(click images for larger views) |
The boat changes character as the work progresses, and now she definitely has an “inside”. In fact scrambling under the gunwale and sitting on the jig inside the main cabin feels roomy and safe even with just two of the panels planked out of the five ( topsides each side, chines each side and bottom) . Her substantial framing and stringers really show up against the diagonal planking and , as I said, she feels good in there.
I was out there the other day with the “power spokeshave“ doing a bit of fairing up in the tricky area around the forefoot. Chris Sayer of Mini Transat fame introduced me to this tool and I’m forever grateful.
Its actually just a lightweight angle grinder, in this case a 100mm Ryobi, set up with a flexible backing pad and a 40 grit sandpaper disc. Its controllable, effective and boy does it move the wood! Practice before you use one or you’ll make big holes where you don’t want them. I slide it along using the guard as a guiding mechanism. Rest a wrist on something solid to pivot on or just take very gentle light strokes.

Planking up to the bow, real progress visible here. Although only dry fitted when the pic was taken the 8.5mm planks formed the hollow entry easily and with some attention will fair up well for the next layer when glued on. The boat has a much sharper entry than one might expect, part of my attempt to reduce pitching in a head sea. |
With care and some skill these are a real boon to someone sick of slaving away at the Armstrong Planer ( In my case a Stanley number 3 hand plane. Armstrong? Strong arm! Oh well, my shovel is sometimes referred to as a “Handraulic Digger”.) Anyway, do try it, but take care, it can cut holes in overalls and whatever is underneath very easily, and that could be you.
Back to the serious stuff, the boat's looking good, that hollow entry is sharp and finer than you’d expect on a boat that is pretty fat for her length, and the frame is absolutely rigid now. No movement at all.
Charlie has used about 1500 stainless steel woodscrews so far, lots more to go! (one at a time he tells me, cant quite figure out how to do two at a time.) Just as well someone invented the cordless drill.
I bought a 14.4 volt two speed Black and Decker FS1462F 10mm 0/300 0/1100 Rpm cordless drill a while back. In my defence it was a part of a customer rewards program and I had to spend some points or lose them. I’d not normally buy B&D after having been bitten by them a few times (the Ryobi comes under the same heading but it was only $40 and I have a Bosch one for really hard use) but this drill is doing really well. Unlike the 12 volt one I have of the same brand which is close to useless the larger one has done a huge amount of very hard work, and as “the screwdriver” is in almost constant use right now.
John Welsford
Designer. Cat feeder.
|
