|
31 January, '06
Watching Charlie working away out in my shop is inspiring. There is a lot of visible progress and the curves of the boat are rapidly becoming much more easily seen. While the weather is a bit hot and humid the slow hardener is working, and the glue surfaces are not so large as to require big mixes of epoxy so the pot life of the West resin is giving him time to do the job.
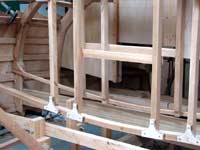
. From inside you can see just how strong the frames and stringers are, remember this is a boat that is only 6.5m ( about 21 ft) long. This is the view of the inside of the port side topsides from the engine bay under what will be the forward section of the cockpit.
(click images for larger views) |
I have him spiling each plank and dry fitting it rather than whacking it straight on and its fun to watch each day as he fits several planks, removes and applies glue then replaces each piece. It might seem pointless doing the fitting twice but it makes for much better fitting and in fact is as quick in the long run.
We’ll have to show you readers the little spiling device that I built for the job sometime, just a simple little piece of ply with two nails and a notch for a pencil, it makes it easy to mark out the curved edge that is required to fit the edges to each other. Remember these are curved both ways, and if you can imagine an orange sliced into sections from top to bottom, you can see the taper at the ends. While the curve in the boats sides are nowhere near as much as the curves on a sphere the planks are still subtly curved, and every one of them is different so a quick way of marking out is a boon.
Another point of interest, is that I have him cutting the edges of the planks at a very slight angle, so that there is a slightly wedged shape gap showing from outside. This makes it easier to fit the inside edge, the one you will see when inside the boat, closely . These edges are not usually glued up when the first layer goes on, when the glue is spread for the second layer it will fill those gaps and the whole lot will become one mass, stiff, strong and watertight.
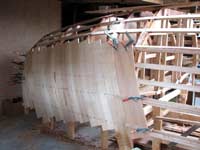
1. From outside, these angled planks are the first layer, each one an easily handled piece of wood that fits relatively quickly over the faired stringers. It feels impressively stiff even with just one layer on. |
Its interesting the changes in the boat as each stage of the build progresses, and I enjoyed yesterday climbing into the framework and looking at the skin from inside. It seems almost finished, and it’s a lovely warm looking wooden interior that looks immensely strong.
Also very evident is the increase in stiffness of the whole structure, I cannot detect any movement at all in the after end now whereas a while ago it was still a bit springy. While this is to be expected its still encouraging.
We took a day off on Saturday Charlie and I, drove up to Auckland the previous evening and camped on the shores of the beautiful Mahurangi estuary with Slipper and Kawau Islands visible off in the distance; a constant stream of yachts coming in for the regatta next day. Brigantines (two) Sloops, ketches, yawls, gaffers and modern boats, classics and plastics, big and small. A wonderful parade. Charlie went out sailing with Dave Perillo in Jaunty (www.openboat.co.nz) for a while, then rowed around the anchored fleet of perhaps 800 boats in one of my Seagull designs, socialised with a whole bunch of my friends and hopefully returned refreshed and inspired.
Back next week with another progress report.
In the meantime, back to the drawing board, John Welsford.
Designer, solver of puzzles, sharpener of tools and maker of cups of tea.
|
